Capturing an Nmap Scan Using Wireshark
Overview
The goal of this project is to capture traffic being sent from one machine to another. Specifically, we will be using Nmap to scan for ports on another machine so that we can capture what is being sent over. To capture and analyze the traffic we will be using Wireshark. You can do this project various ways, however, I am going to explain it the way I did it. If you find a way that requires less steps/resources that works better for you, please by all means do it. I am all for efficiency. Before we begin here are the things that I used to complete this project:
· 2 Virtual machines: 1 guest OS machine and one host machine to capture the traffic between them. I used VirtualBox for the VMs, but you can use any virtualization software you want.
· Nmap: this will be used to send the scans we want to generate traffic.
· Wireshark: this will be used to capture and analyze the traffic being sent over the network.
What is Wireshark?
Wireshark is a widely used network protocol analyzer that allows users to capture and interactively browse the traffic running on a computer network. It provides a detailed and comprehensive way to analyze network data, offering features such as live packet capture, offline analysis, filtering capabilities, cross-platform performance and it’s open source. Wireshark is used by network administrators, security professionals, developers, and educators to troubleshoot network issues, monitor network performance, and understand network behavior.
To install Wireshark you can visit the link here: https://www.wireshark.org/download.html
What is Nmap?
Nmap (Network Mapper) is a powerful, open-source network scanning and security auditing tool used to discover hosts and services on a computer network. It provides detailed information about the devices and services running on a network and is widely used for network inventory, managing service upgrade schedules, and monitoring host or service uptime. Some key features include host discovery, port scanning, version and OS detection, a scripting engine and much more. Nmap is used widely across the industry among network administrators, penetration testers and other security professionals.
To install Nmap you can visit the link here: https://nmap.org/download
Let’s Begin!
For the sake of time I am not going to explain how to setup the VMs in this project however, you can use a Metasploitable machine to test if you would like which I demonstrate how to setup/configure here: here. Any VM machine will work, Windows, Linux, etc.., it just needs to be configured on the same network so that the machines can talk to each other.
1. Go ahead and power on your VMs. One host VM and one other guest VM. You can clone the same VM if you want to save time.
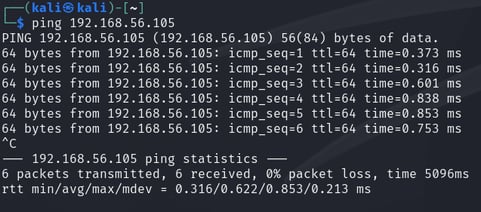
2. Once logged in to all your VMs, verify your VMs can ping each. This tells you they’re on the same network. (kali = host machine, msfadmin = guest machine).
3. Once the machines are talking, go ahead and boot Wireshark in your host machine.
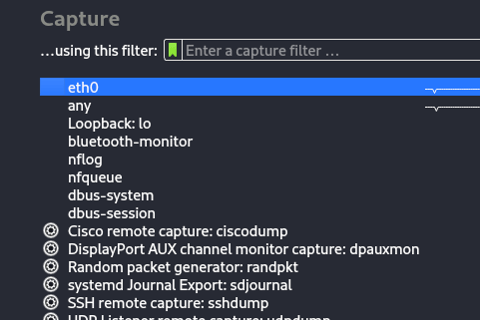
4. Once open, select the network adapter that you want to capture. Choose the one that your guest and host machine are using. In our case it’s eth0.
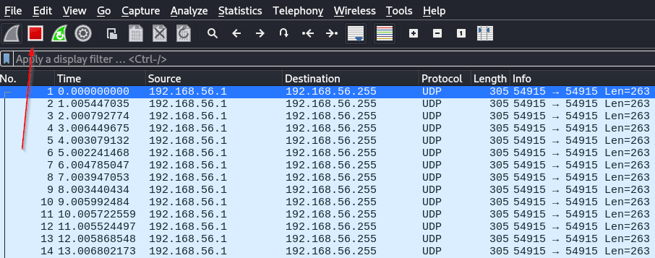
5. Once you select your network adapter, Wireshark will begin capturing packets. To stop this, click the red stop button in the upper left corner
6. If you want, you can click the blue shark fin next to the stop button to start capturing again, however, I will prep the following Nmap command in our terminal prior to that. sudo nmap -sV -sT -v -O -p 1-100 <IP ADDR> replacing the <IP ADDR> part with the IP address you’re targeting.
Let’s break this command down.
· Nmap: This initiates the Nmap application.
· -sV: This enables service/version detection of ports and applications running on the machine.
· -sT: Specifies a TCP connect scan to establish a connection.
· -v: Provides verbose output. Use -vv for more verbosity.
· -O: Enables OS detection.
· -p 1-100: Specifies which ports you want to scan. Use -p- to scan all ports. (If you don’t specify any port numbers, Nmap scans the most common 1000 ports by default).
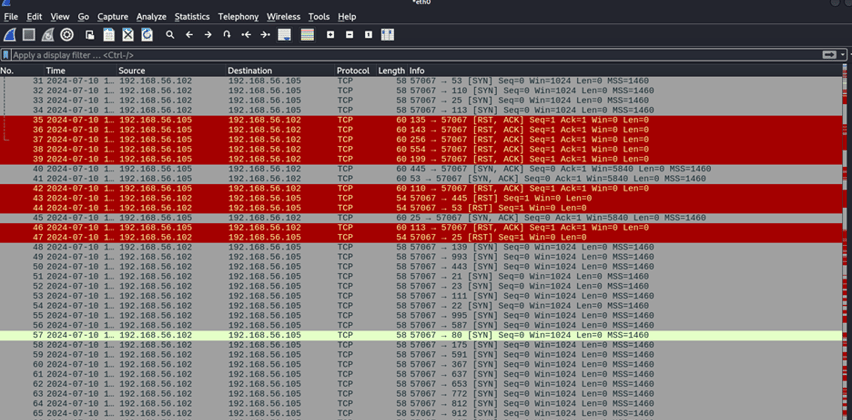
7. If you haven’t already, begin capturing packets again in Wireshark. After that run your Nmap scan. As your scan runs you should see Wireshark generating a lot of output.
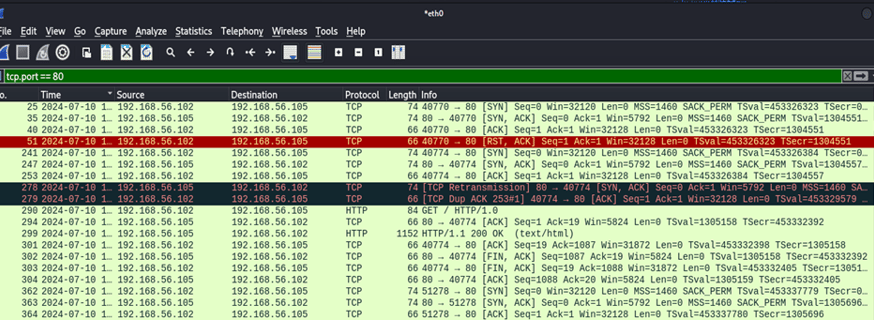
8. Let’s say we only want to see traffic relating to port 80 (http). Since a lot of this information looks like noise, we’re going to filter it out by typing the following in the Wireshark display filter at the top. tcp.port == 80
9. Perfect, lets focus in on the first four packets and what they’re doing. The first packet is coming from our host machine sending a SYN (Synchronize) packet to our guest machine. The guest machine responds with a SYN, ACK (Acknowledge) packet letting our host machine know that it has received the request. The host machine then acknowledges the response with an ACK packet and then terminates the connection with an RST, ACK (Reset) packet. This is referred to as a three way handshake with the RST, ACK packet cutting off the connection abruptly.
10. Now not all SYN,ACK,RST responses are the same. For example, RST packets may be sent for various reasons including when a port is closed or unavailable, a connection is invalid or is being attacked or compromised. There are other packets such as FIN packets that terminate connections as well except they allow the data to finish transferring first before severing the connection.
Save Your Capture!
1. Now that you’ve captured some packets it might be a good idea to save them as a pcap file so that later on you can refer back to any data that may seem suspicious. To do this click File > Save as > choose file name.
2. To open it you can drag and drop it into Wireshark or open Wireshark go to File > Open > select your file name.
Conclusion
There’s A LOT more to learn about Wireshark and Nmap as this was a very basic intro to showing how they can be utilized to assist in your daily network or security needs. Both tools are essential for network administrators, security professionals, and anyone interested in understanding their network's behavior and security posture. By mastering Nmap and Wireshark, you can gain deep insights into network operations, identify, and mitigate security threats, and ensure optimal network performance. Happy learning!
